Toyota Tundra SQ1 & SQ2 Stereo System Modification List
The Toyota Tundra SQ1 / 2 packages can be installed with reversible modifications to the truck.
Video Assistance:
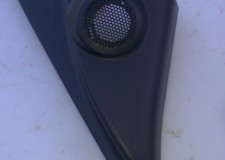
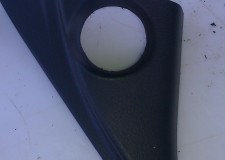
Tweeter Mounts:
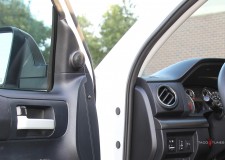
Front Doors:
NON JBL Tundra’s have a set of dash speakers that resemble tweeters. WE provide mounts that allow you to install aftermarket tweeters in this dash area.
Trucks equipped with JBL have tweeters installed in the door sail panels (panel that covers the door mirror bolts). In many cases our customers will remove the old tweeters and dremel the tweeters to allow new after market tweeters to appear to be stock. If you are concerned about returning these back to stock, you can purchase a set of these JBL mounts for around $65.

Rear Doors:
JBL and NON JBL Tundra’s have tweeters in the rear door panel above the door handle. We offer two choices here.
- With some minor trimming on door panel you can install the a set of CTX65CS tweeters in the stock location. The aftermarket tweeter will slide into the stock tweeter location. Use a couple of zip ties to hold in place. You will not be able to see any of the mods.
- Use a coaxial speaker and leave the old tweeter inactive.
- If you using other brand tweeters, you can dremel the rear door panels. The tweeters will look very much like stock. However, you can’t return back to stock. So some customers will just leave the aftermarket rear speakers when they sell their truck.
- Another modification is you have to drill through harness plastic to get wiring through OR you can drill a hole in the metal. We generally go through the plastic. In our install vids, we show you how we do this.

Subwoofer Installation:
Installing the subwoofer in the Toyota Tundra is relatively simple. However, you must follow certain steps to ensure proper fit.
Modification 1: Remove the “padding” and stock subwoofer (JBL Truck). Keep all the hardware so you can return to stock.
Medication 2: Install matting on the rear wall. We offer discounted pricing on matting to our customers that purchase the SQ1 or SQ1 package. We have been using Ballastic Matting for years. It is thicker and adheres much better than other types of matting. Plus they recently went to a black foil. This is a big plus for installing a subwoofer behind the seat of your Tundra. The matting will stay in place if you return truck to stock. However, you can reinstall the padding and subwoofer (if equipped in JBL systems)
http://www.ballistic-online.com
Modification 3: If you purchase the SQ1 or the dual kicker subwoofer box, there is a rod that holds the upholstery in place. This rod is on the rear of the seat and will need to be bent forward around ½” inch. This has no effect on the seats nor can you see the modification.
NOTE: Many customers report they do not have to do this on their truck, but we still recommend that this be checked to ensure the subwoofer does not hit the seat.
Modification 4: (New Version Ported Boxes) In the newer version of the Toyota Tundra Crewmax subwoofer boxes, you will need to trim some plastic on the seats. You will need a Dremel or file. Don’t worry you can’t see the modification nor does it affect the operation. This simply allows the seat to move up / down as designed.
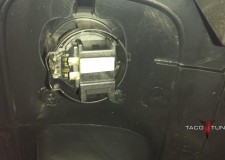
Rear Door Wire Harness:
When running speaker wire through the stock wiring locations, you will need to modify the rear door wire harness. The harness on the rear door is a two piece connection. You will need to drill a large enough to run the speaker wire(s). This does not affect the performance of the truck and can’t not be seen. Most customers leave speaker wire in place if they decide to remove the system when selling the truck.
The only modification that can not be “undone” is the rear door tweeter mount. That is why we offer the option to substitute coaxial speakers in place of components for the rear doors.
Additional Installation Information:
Installation Notes:
The ReCurve will allow you to keep your stock head unit. NON JBL Head units are plug and play with no cutting or splicing of the factory wires. Generally we mount the ReCurve under the rear passenger seat. Make sure the ReCurve is mounted and not allowed to move around. Make sure the RCAs do not come in contact with any metal. On the NON JBL units be sure to unplug the power source under the passenger seat. Be sure to watch install videos before you start.
The Javelin amp will fit under the driver seat of your Tundra. We include spacers and screws to attach to your Toyota Tundra.
We generally hide the crossovers under the center console to right of the shift knob.
The subwoofer installation will require small and reversible mods to your Toyota Tundra. You will need to remove the current “padding” that is behind the seats and if you have a JBL system you will remove the stock subwoofer. WE HIGHLY suggest the use of matting material on the rear wall (and doors) to keep the rear wall from vibrating. We have been using Ballistic Matting for years and recently they changed the color of their foil to black. It works great to match the sub and unlike silver matting not easily seen. If you remove the sub box (if you sell your Tundra), the padding can be put pack into place so save the clips. On the larger seat, on a few models there is a metal rod that holds the upholstery in place, you might have to bend that forward about a half inch. This seems to vary just a bit from truck to truck. You will want to be sure the subwoofer is not coming in contact with the seat. STeps for sub install:
1. Remove the back seats. Get some help they are heavy. Please some cardboard or carpet on your carpet to protect it from the seats as you remove them.
2. Remove the back padding on the rear wall and matt the wall.
3. Install the subwoofer box with only one subwoofer in place. The subwoofer closest to driver side needs to be in place. Dont’ forget to connect the terminal cup and wire the subs appropriately.
4. Install the larger seat (driver side) by inserting the FRONT mounting pins, then slowly drop the rear of the seat down. The seat bracket will fit in the “notch” on the front of the subwoofer box.
5. Tighten the bolts down on larger seat (driver side), check that the upholstery rod is pushed as far forward as possible. You might have to hammer it forward. This will not affect the seat performance.
6. The mounting block and bolt included with the sub will cover the square hole on the back of the subwoofer box. Do NOT over tighten the bolt. Tighten just enough where the box will not move or rattle.
7. After tuning and setting up the system ensure the subwoofer (closest) to driver side is not coming in contact with seat. We can not warranty claim a subwoofer with physical damage.
8. Install the passenger side seat.