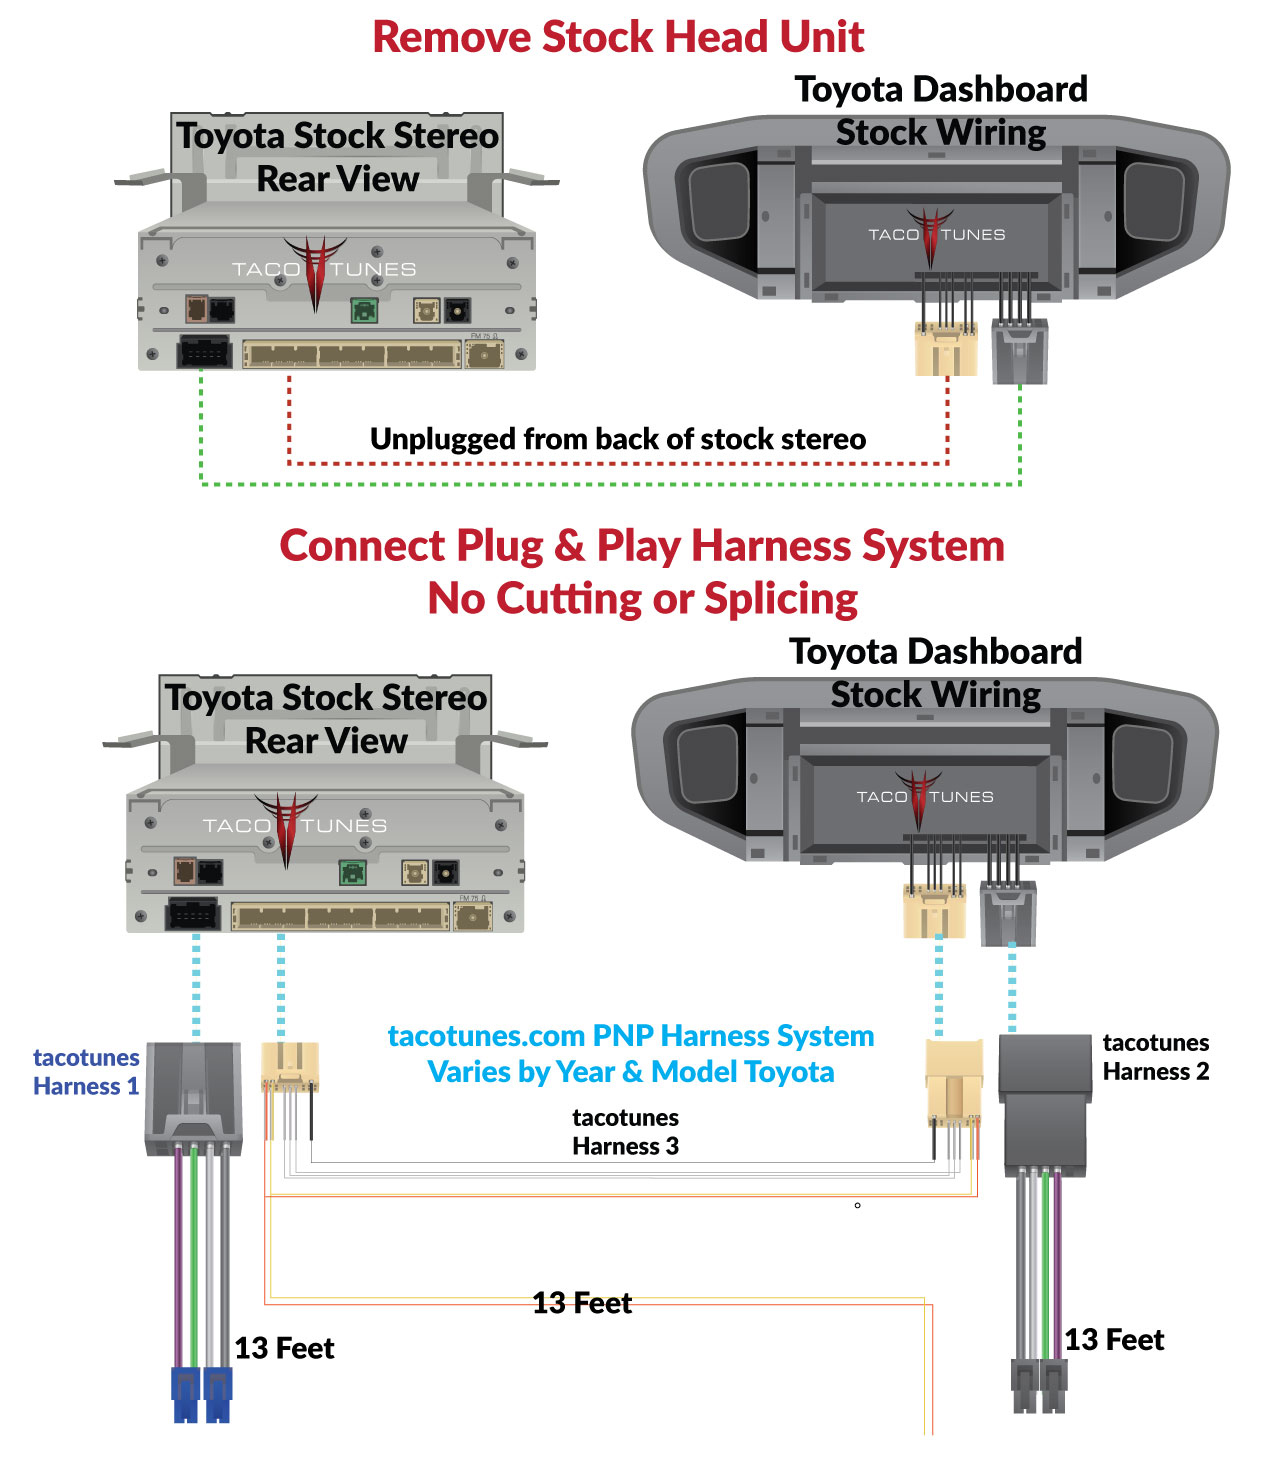
Below are a few examples of how the NTUNE6 will allow you to connect aftermarket amplifier(s) to your stock stereo. There is no cutting or splicing of factory wires required.
Please note that harnesses will vary by year and model Toyota. However, the connection concept(s) remain the same. NOTE: MOST 2014-2021 Toyota Tundra connections are located under the front passenger side seat. DO NOT REMOVE THE HEAD UNIT.
The remaining Toyota models are connected behind the stock stereo (head unit).
THESE INSTRUCTIONS ARE NOT INTENDED FOR TOYOTAS EQUIPPED WITH JBL AUDIO SYSTEM.
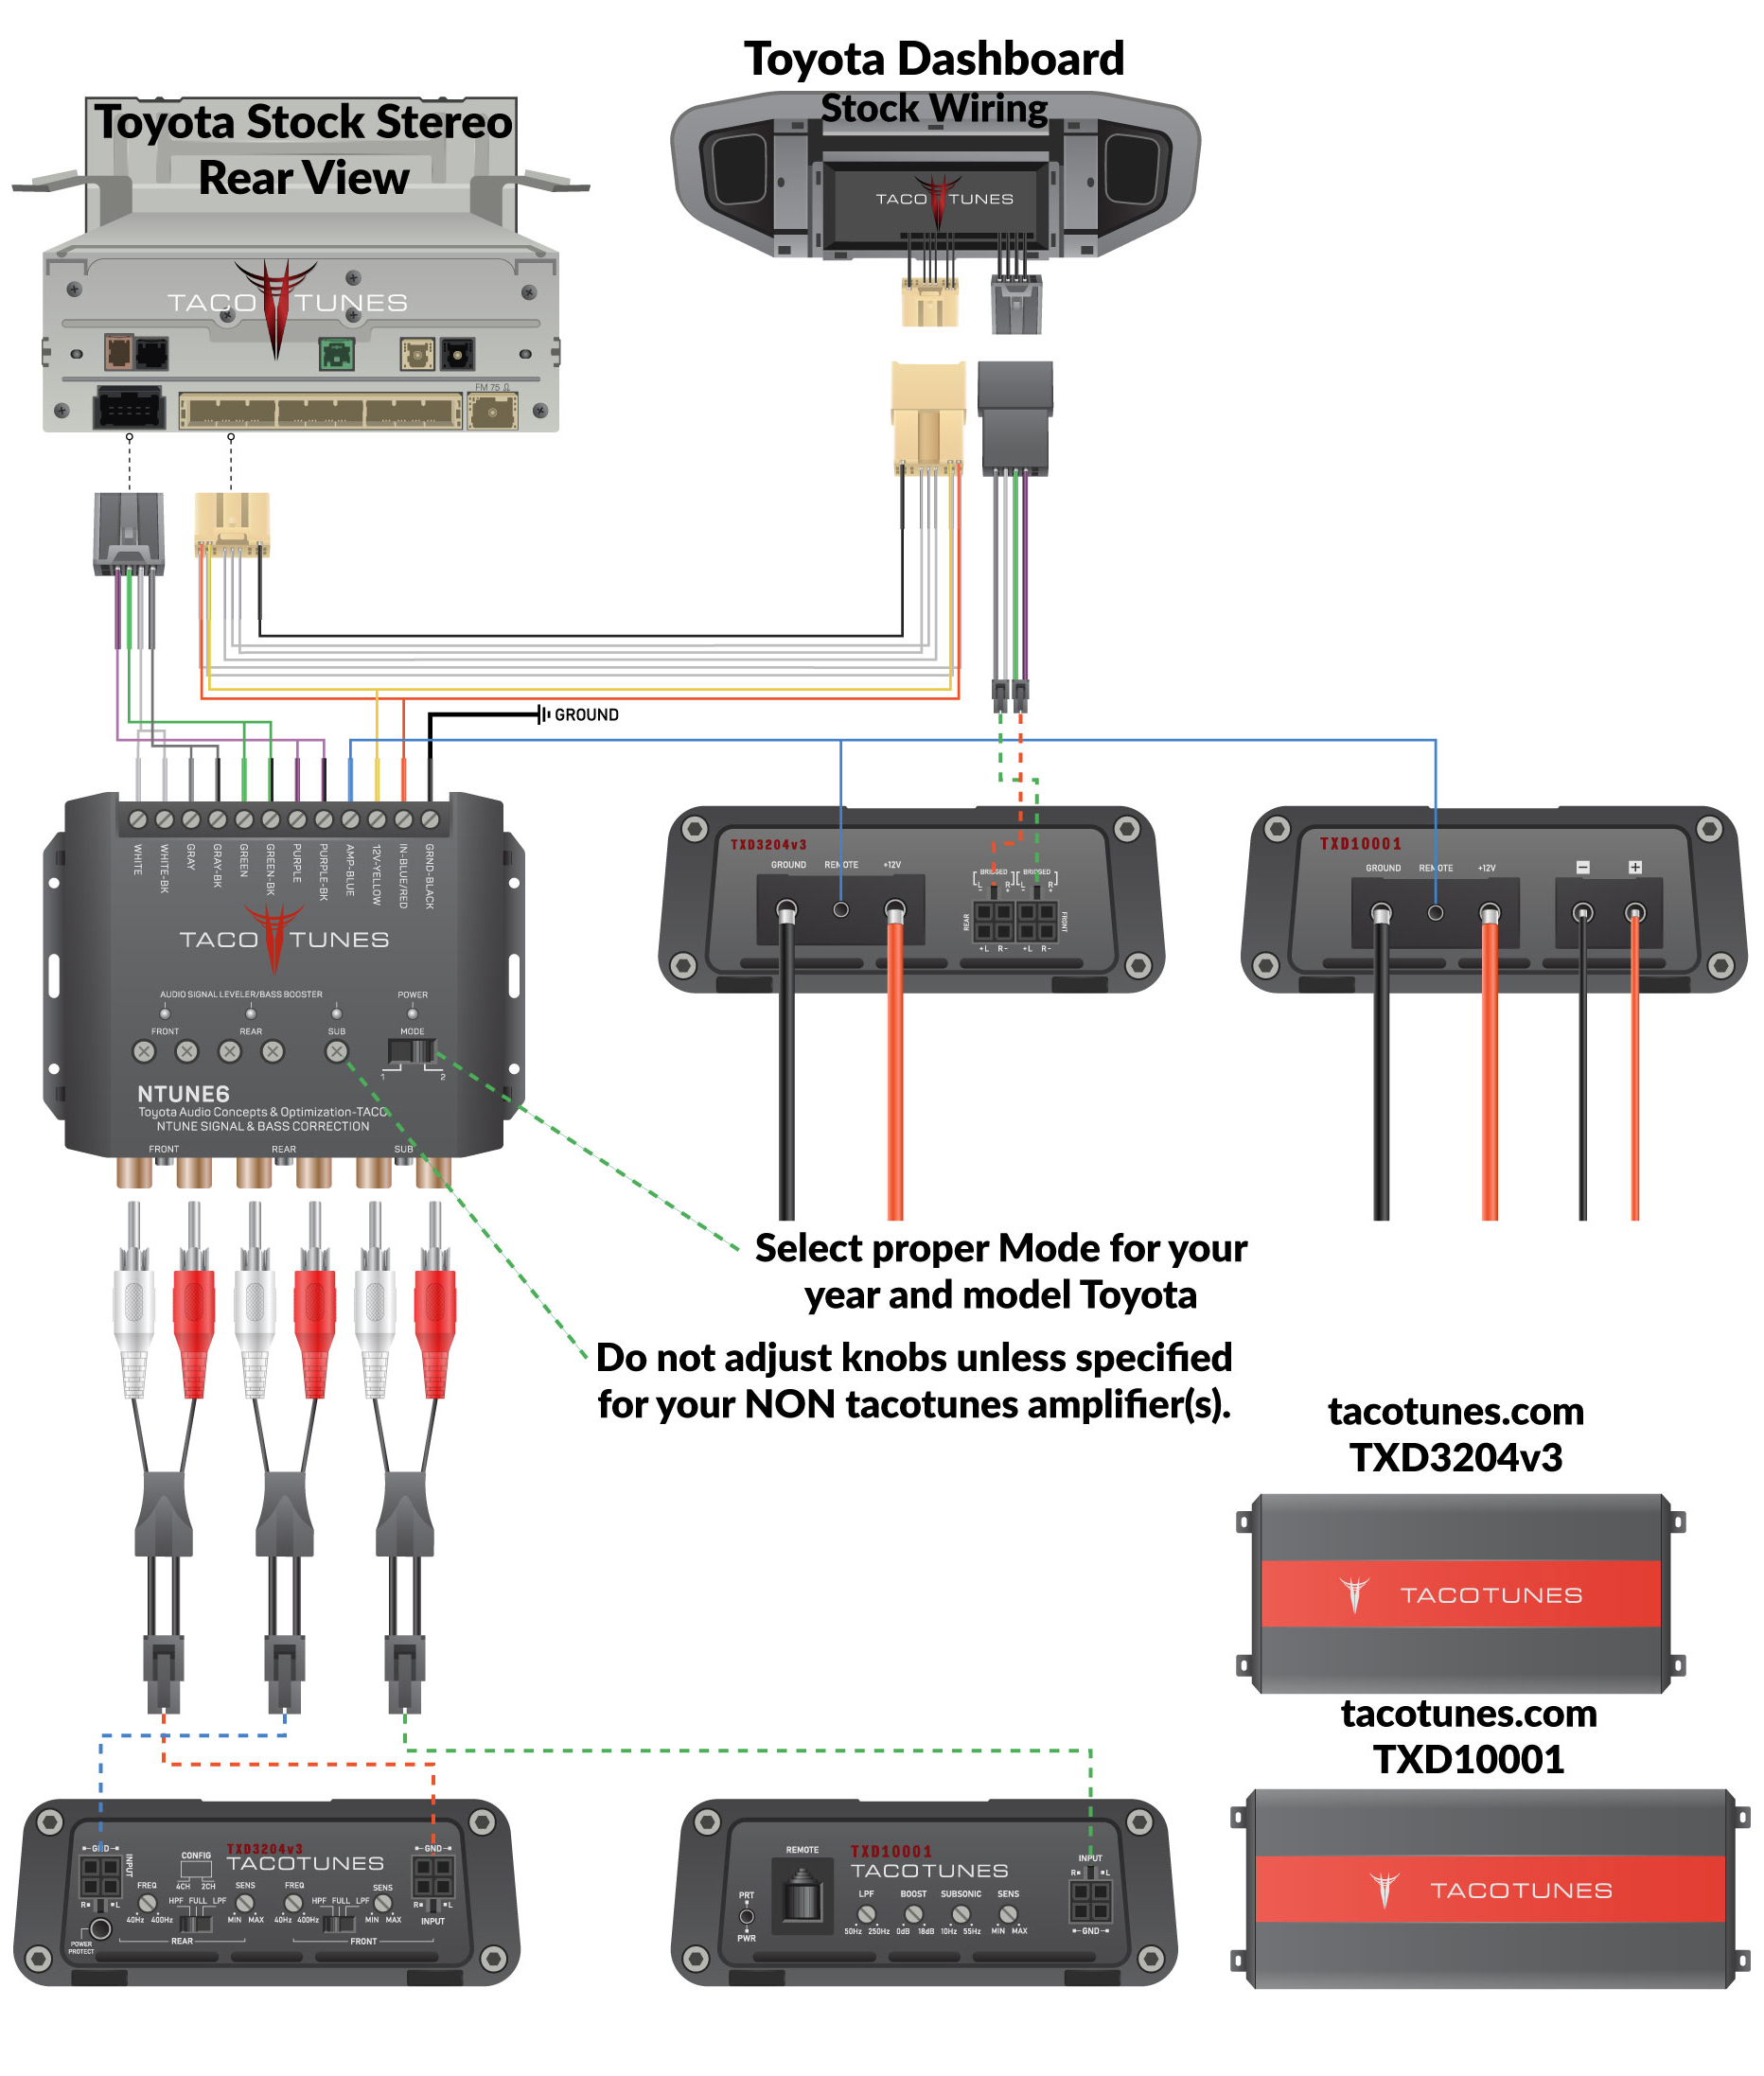
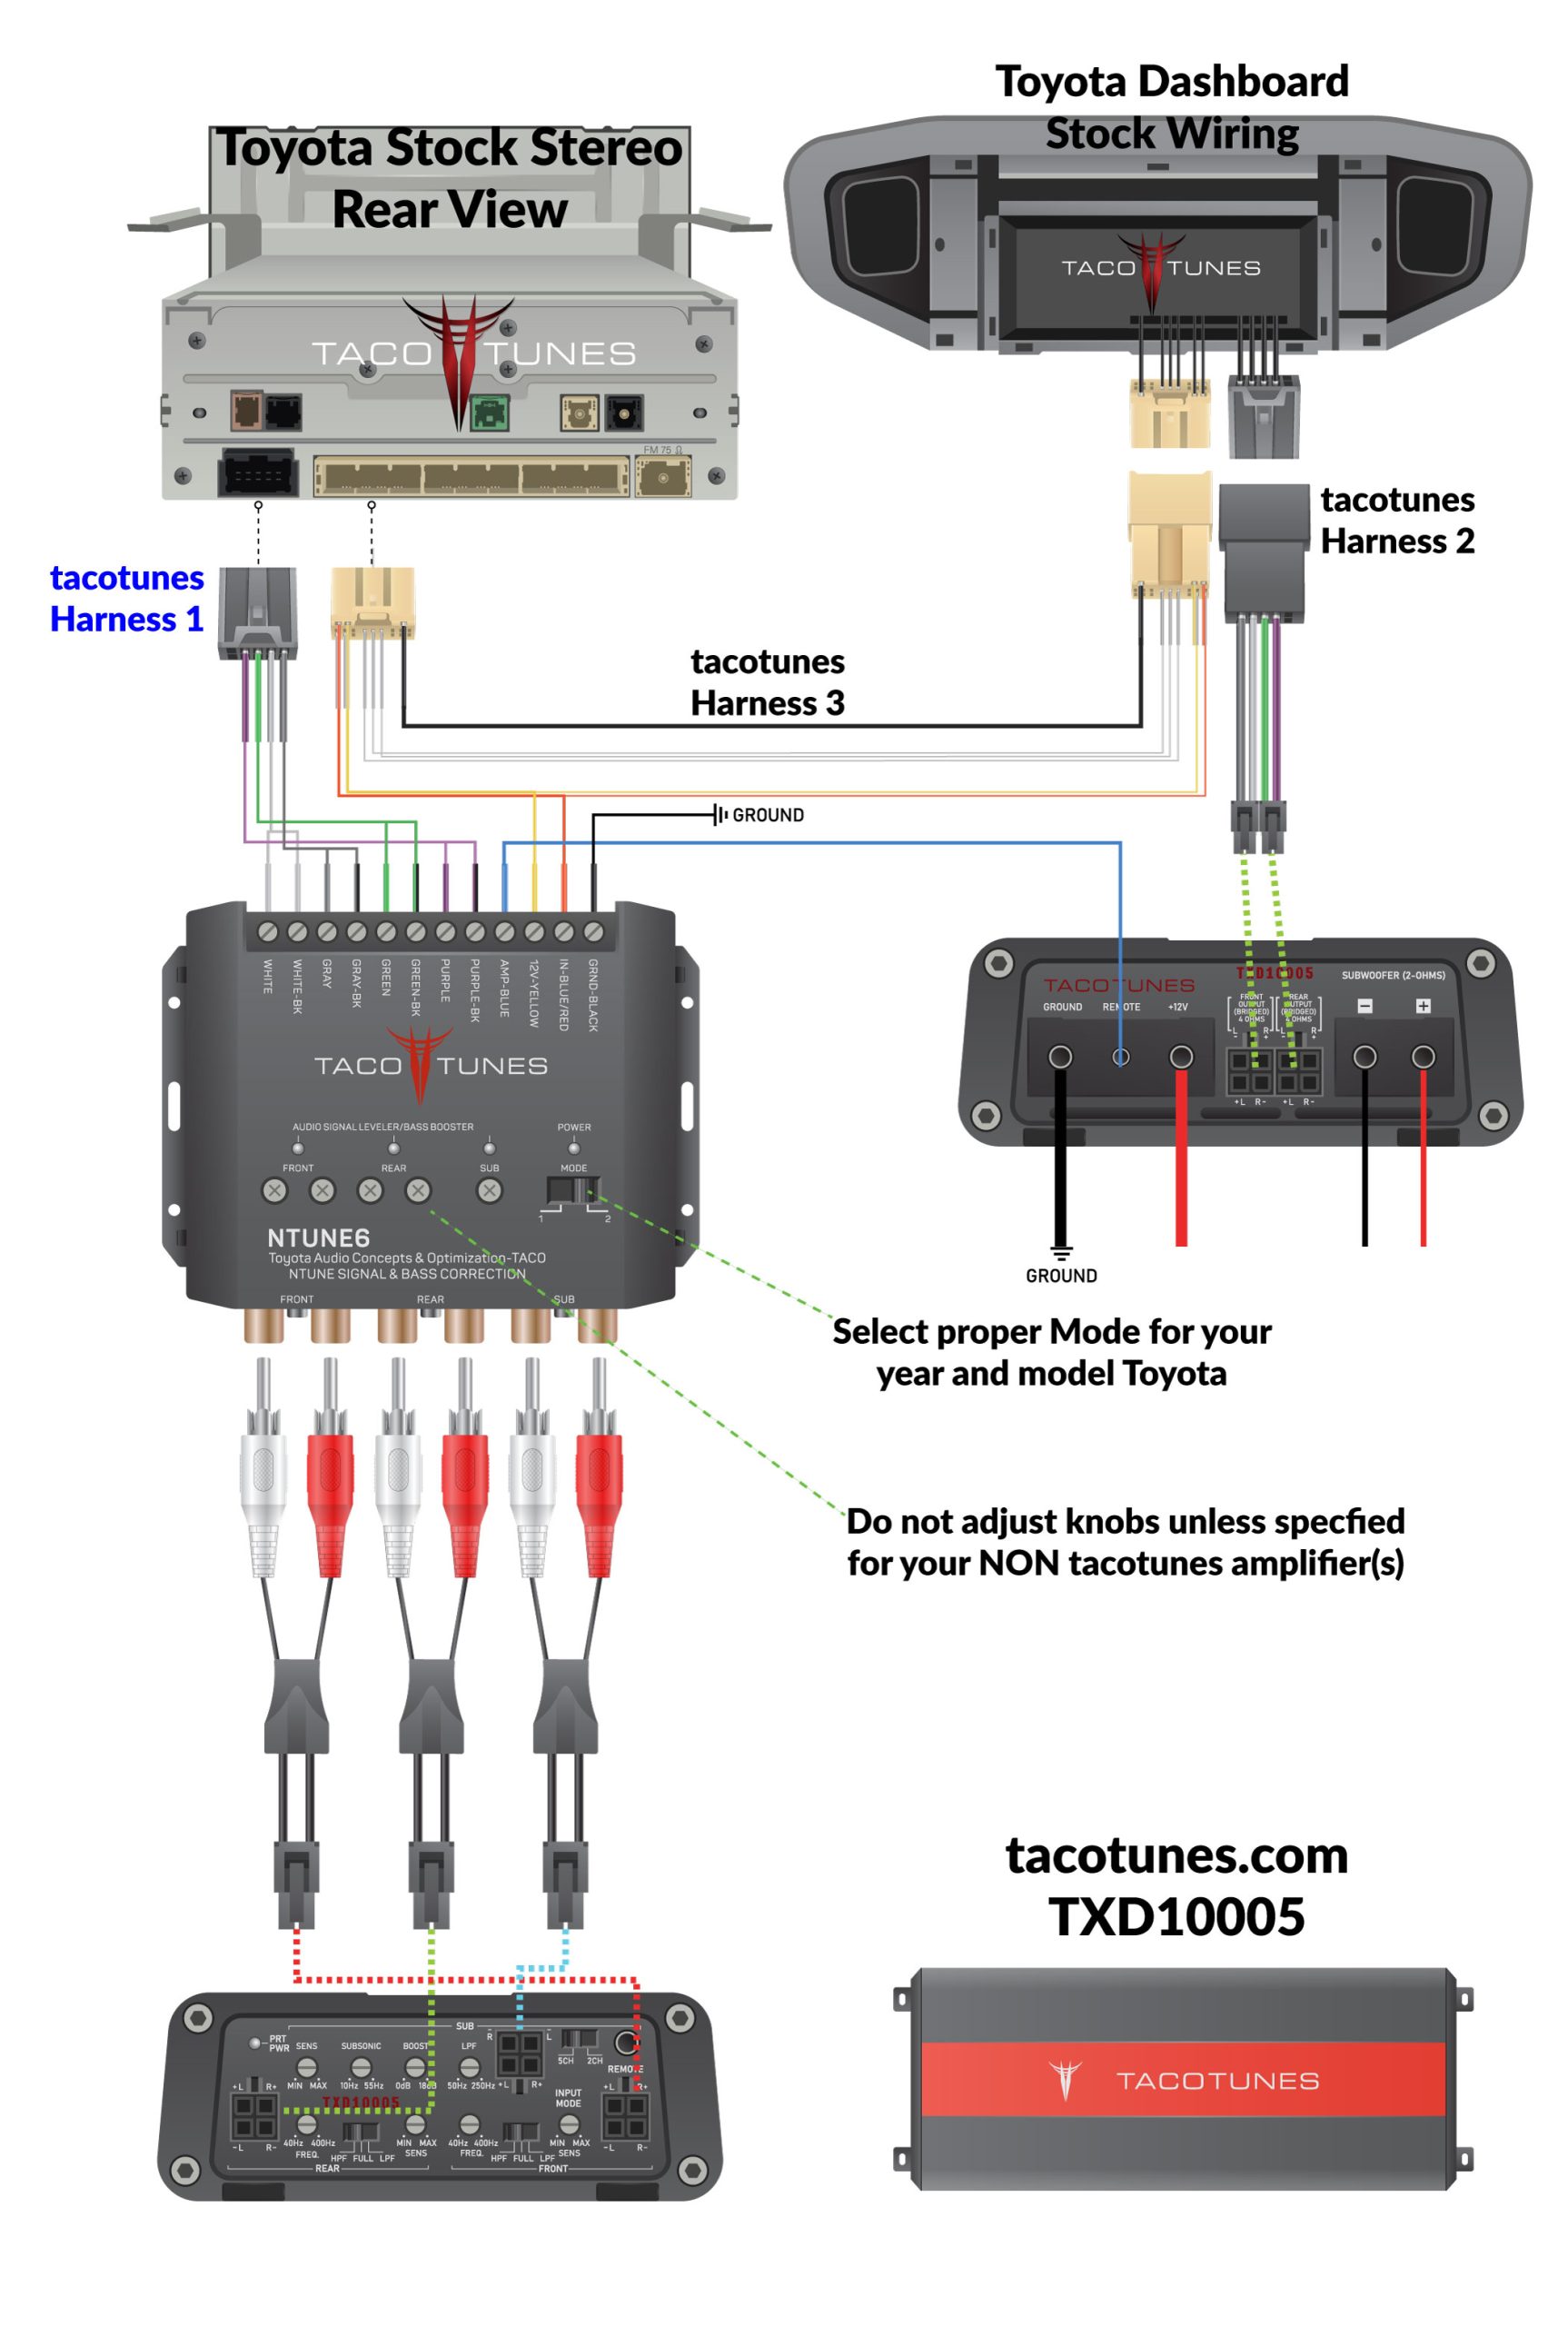
Example Installation – NTUNE6 with TXD10005 – Tacotunes 5 Channel Amp
NTUNE6 Install Steps:
- DISCONNECT YOUR NEGATIVE BATTERY TERMINAL.
- 2014-2021 Toyota Tundra – DO NOT REMOVE HEAD UNIT. The connections are under driver side passenger seat.
- Remove stock stereo and unplug all the harnesses. NOTE: Count the number of plugs that you remove to ensure you get them all installed. We also suggest taking some pictures of the back of the head unit and wiring before you remove the wires.
- Run your plug and play harness system to your NTUNE6/Amp Location.
- Plug harness #1 into the back of your stock stereo. Ensure it is in the matching location / plug. (see diagram)
- Plug harness #2 into harness that was unplugged from the back of your stereo. (see diagram)
- Plug male side of harness #3 into the back of your stock stereo. (see diagram)
- Plug female side of harness #3 into the harness you removed from the stock stereo. (see diagram)
- Plug in the remaining plugs into your head unit and temporarily install the head unit into place. Attach at least one bolt.
- IMPORTANT STEP, READ CAREFULLY: Cut the TWO (2) BLUE molex plugs off Harness 1 that have 4 wires attached. Do not cut the Blue molex plug off with only 2 purple wires (this will not be used with NTUNE6). DO NOT CUT BLACK MOLEX PLUGS OFF HARNESS 2.
- Insert the WHITE, GRAY, GREEN & PURPLE WIRES from Harness 1 into NTUNE6 (see diagram).
- Connect Blue Wire (AMP-BLUE) from NTUNE6 to your Amp’s Remote In Location (see diagram)
- Connect your Yellow & Red Wire (sometimes this is a blue wire) from Harness 3 to your NTUNE6. (see diagram)
- Connect your Ground wire to your NTUNE6 and ground to chassis.
- Connect your 3 RCA to Molex Adapters to your NTUNE6. (see diagram)
- Connect Molex Plug to corresponding Front, Rear & Sub inputs on your TXD Amp(s). (see diagram). If using your own amp(s) you will need to purchase your own standard RCA cables.
- Connect your negative battery terminal temporarily and ensure your head unit, Ntune6 and amps power up.
- IMPORTANT: NEVER DRIVE YOUR TOYOTA WITHOUT ALL AIRBAGS RECONNECTED.
- Don’t forget to install the remaining bolts and tighten up your head unit!
Congratulations your NTUNE6 is successfully installed!
Having issues?
Troubleshooting tips:
Ensure all harness were snapped into place firmly both behind head unit and Molex plugs into the amp/s
Ensure all bare wiring into the Ntune6 was secured well but not too tight that it may degrade the integrity of the wire; good practice is to turn until tight. give a little wiggle to settle the wire, then a small semi- turn to tighten it back up.
Grounds to chassis must be grinded/sanded down to bare metal for best contact, this goes for amps as well as processors.
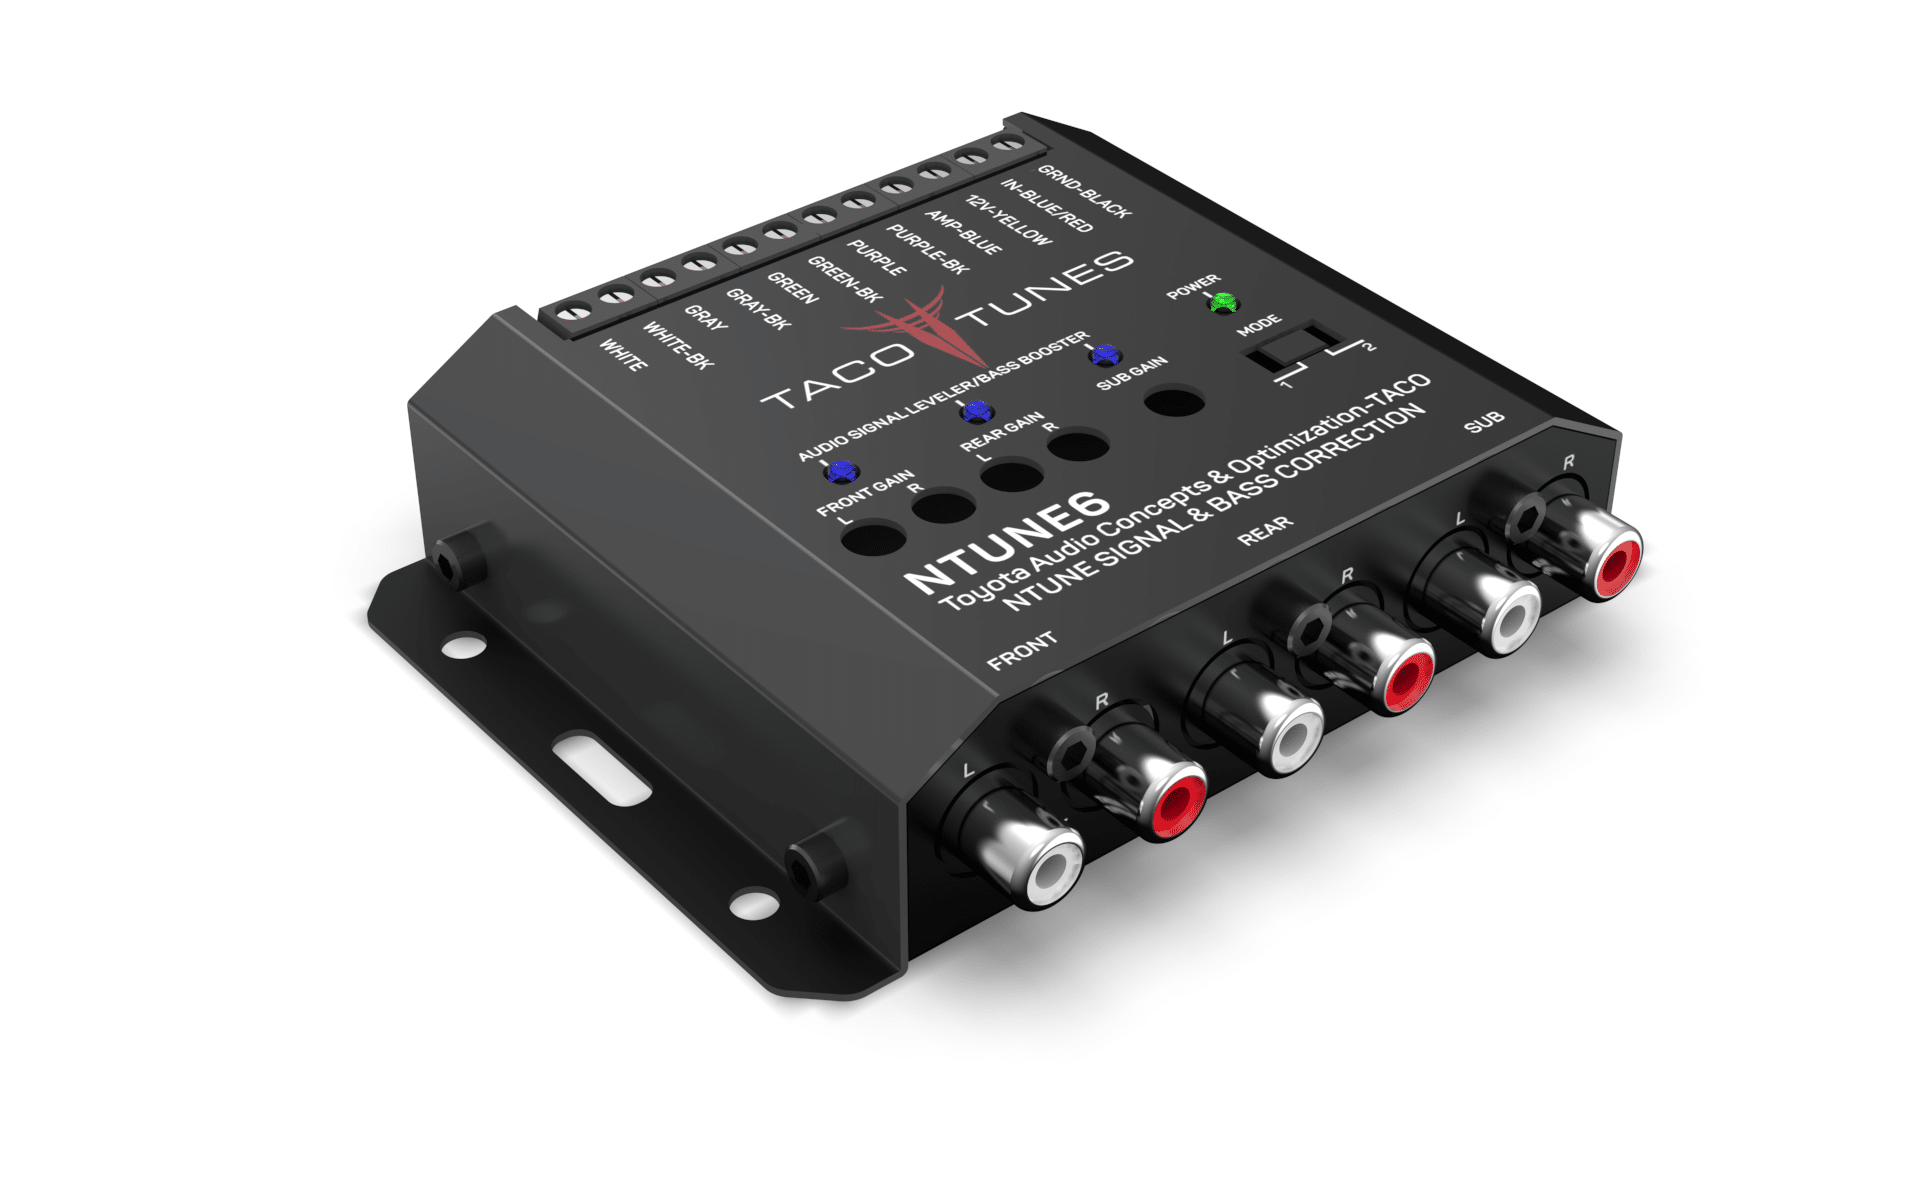
Mode & Knob Settings:
Mode 1 & Mode 2 will vary by vehicle year and model. We will continue to update the list below. Please note we are NOT using the NTUNE6 for JBL equipped units at this time.
DO NOT ADJUST LEVEL KNOBS. THEY ARE SET FROM FACTORY. If you are using a non tacotunes AMP, you may be required to make knob adjustments.
Tundra (Non JBL Equipped):
2007-2013 Tundra: Mode 2 (CD Player)
2014-2019 Tundra: Mode 2 (CD Player) – Connections are under passenger side seat.
2020-2021 Tundra: Mode 1 (No CD Player) – Connections are under passenger side seat.
2022+ Tundra: Mode 2 (No CD Player)
Tacoma (Non JBL Equipped):
2005-2019 Tacoma: Mode 2 (CD Player)
2020+ Tacoma: Mode 1 (No CD Player)
Camry (Non JBL Equipped):
2011-2017 Camry: Mode 2 (CD Player)
2018+ Camry: Mode 1 (No CD Player)
4Runner (Non JBL Equipped):
2009-2019 4Runner: Mode 2 (CD Player)
2020+ 4Runner: Mode 1 (No CD Player)
Example Installation – NTUNE6 with TXD3204 & TXD10001 Amplifiers – How to add amps to your stock Toyota Stereo System.