How to remove stock stereo and install new aftermarket head unit
You want to install an Alpine, Clarion, JVC, Jensen, Kenwood, Pioneer, Sony, or other brand(s) . . .but you don’t want to lose the stock look of your truck? We will show you how to remove stock stereo and install new aftermarket head unit.
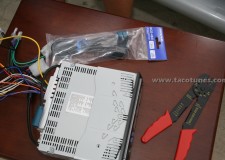
Installation kit designed to integrate an aftermarket head unit / receiver into your Tacoma vehicle dash.
Head units generally come in either single DIN (180 x 50 mm panel) or double DIN (180 x 100 mm panel) size. The depth is not standardized. The US standard for a DIN radio is 2″ x 7″ and the Double DIN sized radio is a 4″ x 7″. Your new head unit will say single or double DIN.
We are going to walk you through installing an Alpine Single DIN Head Unit (Stereo) into your FJ cruiser
Remove the sleeve from the unit as shown. This part is not necessary with the dash kit.
Remove the trim ring from the stereo. Use caution not to break the faceplate for future use if necessary.
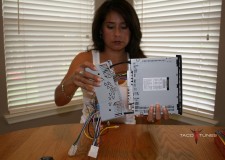
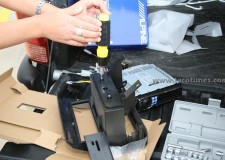
Assemble the dash kit per the instructions included. Then slide the stereo into the dash kit as shown above.
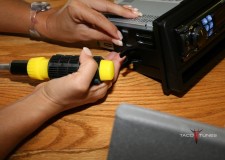
In our dash kit, we include a tool kit that will have everything you need to install your stereo. Assemble the philips screwdriver.
Using the screws included in your head unit. Fasten the stereo to the dash kit as shown.
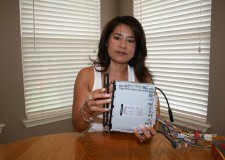
Nearly ready for installation.
Pick a nice cool spot.
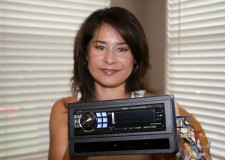
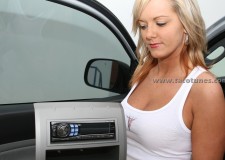
Head unit ready for install.
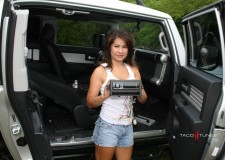
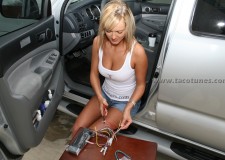
Getting ready for the install. Place your tools in the passenger seat.
Using a philips head, remove the screw for the trim piece as shown above.
Remove the screws that hold the dash kit in place
Carefully pull the trim piece at the top. Notice the pink “tabs”. They are compression clips. Simply pull straight back.
Repeat steps for driver side trim piece.
Repeat steps for driver side trim piece.
Repeat steps for driver side trim piece.
Remove the screw holding the panel as shown.
Remove the screw holding the panel as shown.
Carefully remove the trim panel by pulling outward.
Trim panel removed.
Using the socket set included in our kit, remove the 4 bolts holding the old stereo in place.
Using the socket set included in our kit, remove the 4 bolts holding the old stereo in place.
Using the socket set included in our kit, remove the 4 bolts holding the old stereo in place.
Simply slide the old stereo straight out.
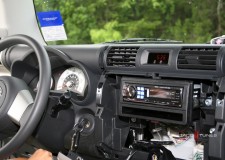
Stereo exposed.
Using 1 hand to hold the head unit, remove the plugs on the back of the stereo with the other.
To remove the antennae just gently pull straight out.
Head unit removed.
Plug in the antennae and the two matching plugs. They are different size so you can’t mix them up.
Oops! Don’t forget to install the lower support bracket on the dash kit.
Head unit ready to install.
Note: You will lose your aux input. In this case we will be installing an Ipod cable. This is much better than the aux input.
So you will have a plug left over.
Oops, we almost forgot to install our lower bracket. This was her first install ever.
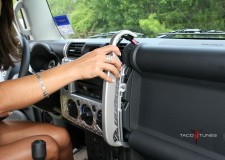
Carefully slide the unit into place.
Line up the holes and put the screws back in place.
Line up the holes and put the screws back in place.
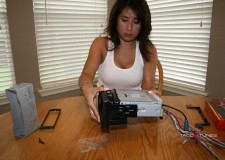
Tighten the four bolts as shown.
Tighten the four bolts as shown.
Tighten the four bolts as shown.
Tighten the four bolts as shown.
Tighten the four bolts as shown.
Be careful not to break a finger nail!
Turn on your FJ and make sure your stereo powers up. Then make sure you can get a radio statio. If you connected your Ipod, make sure that is working also. Check ur bluetooth.
Insure all the wires are tucked away.
Carefully install the trim piece as shown.
Install trim screws as shown.
Install trim screws as shown.
Install trim pieces as shown.
Repeat for passenger side.
Install screws and tighten.
Install screws and tighten.
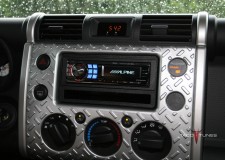
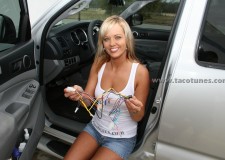
Congratulations! Your new head unit is installed. This was our installer’s first head unit install.
Close up of stereo installation.
How to install Ipod Zune MP3 in your Toyota Tacoma Double Cab 2005 2006 2007 2008 2009 2010 2012 2013 2014
How to install in dash receiver in your Toyota Tacoma Double Cab 2005 2006 2007 2008 2009 2010 2012 2013 2014
How to install radio in your Toyota Tacoma Double Cab 2005 2006 2007 2008 2009 2010 2012 2013 2014
How to install HD radio Sirius and XM in your Toyota Tacoma Double Cab 2005 2006 2007 2008 2009 2010 2012 2013 2014
How to remove the factory stereo in your Toyota Tacoma Double Cab 2005 2006 2007 2008 2009 2010 2012 2013 2014
How to remove stock stereo and install new aftermarket head unit
You want to install an Alpine, Clarion, JVC, Jensen, Kenwood, Pioneer, Sony, or other brand(s) . . .but you don’t want to lose the stock look of your truck? We will show you how to remove stock stereo and install new aftermarket head unit.
Installation kit designed to integrate an aftermarket head unit / receiver into your Tacoma vehicle dash.
Head units generally come in either single DIN (180 x 50 mm panel) or double DIN (180 x 100 mm panel) size. The depth is not standardized. The US standard for a DIN radio is 2″ x 7″ and the Double DIN sized radio is a 4″ x 7″. Your new head unit will say single or double DIN.
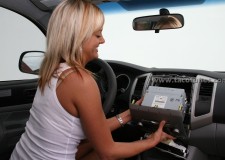
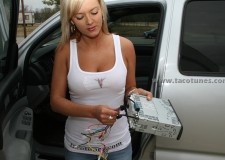
Tina will be showing you how to remove your old stereo and dashboard. From your Toyota 4Runner and Install a new after market head unit.
Before you start any audio project we recommend that you disconnect the battery to ensure a safe install.
Tina laughing at something!
Gently insert a putty or butter knife below the AC knobs as shown. We HIGHLY recommend applying blue painter’s tape around the areas you will be working. This will alleviate potential dash scratches.
As shown above, gently pry downward to remove the AC control panel.
AC Panel Removed.
You can leave it hanging or remove the connectors and remove out of the way.
If you will be performing a major stereo upgrade with amps, Ipod, Satellite etc, it would be a good idea to remove the AC controls by simply unplugging the harnesses.
Using 1 hand to hold the head unit, remove the plugs on the back of the stereo with the other.
They have a release tab that you need to push to release. No need to label as they are all different sizes. Be careful this is where most dash scratches seem to occur.
If you purchased the dash kit and tools from our website, use the 10mm socket included in the kit. Using the proper size socket, remove the 4 bolts under the stereo as shown.
As shown, pull the old head unit straight out and away from the dash.
Using 1 hand to hold the head unit, remove the plugs on the back of the stereo with the other.
They have a release tab that you need to push to release. No need to label as they are all different sizes. Be careful this is where most dash scratches seem to occur.
To remove the antennae just gently pull straight out.
Head unit removed.
Head unit removed.
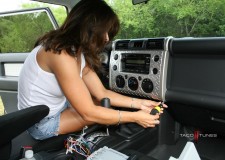
Head unit and wiring steps.
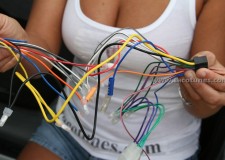
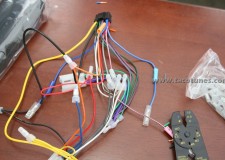
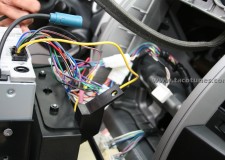
Locate the wire harness included with your stereo and the wire harness we included in your dash kit. If you purchased the JBL adapter kit, you will receive another set of instructions in your JBL wiring kit.
Match the colors on the two wire harnesses and twist them together as shown.
Using crimp caps and crimp tool, insert the wire into the cap and crimp as shown. We include crimp caps with the Toyota specific wire harness.
Using crimp caps and crimp tool, insert the wire into the cap and crimp as shown. We include crimp caps with the Toyota specific wire harness.
Stereo harness connected to toyota wire harness.
Close up.
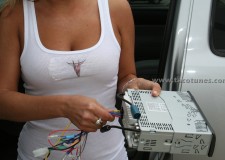
Plug stereo harness into the back of the head unit.
This will also be the time to plug in USB, IPOD or other devices to your new head unit.
Assemble dash kit per instructions included. Use a piece of cardboard to protect the finish on your new dash kit.
Assemble dash kit per instructions included. Use a piece of cardboard to protect the finish on your new dash kit.
Ensure proper fit and finish.
Remove the hazard button and clock from old head unit. There are four tabs holding the this module.
Ready for installation
Check all your cables.
Match the plugs from your truck to the wire harness and simply plug them in.
Don’t forget your antennae.
No cutting of your factory wires.
True plug and play installation.
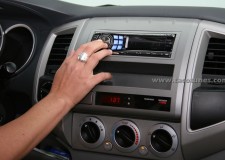
Turn on the truck on and ensure your stereo and hazard lights work.
Install the head unit into truck.
Locate the four screws from the old head unit.
Tighten the 4 screws as shown.
Tighten the 4 screws as shown.
Re-connect the wires to your AC controls and ensure they are working.
Lift into place and push the controls back into the dash.
Congratulations, your new head unit is installed.
Toyota 4Runner Stereo Installation and dash removal instructions
Toyota 4Runner Stereo Installation and dash removal instructions
Toyota 4Runner Stereo Installation and dash removal instructions
How to install Ipod Zune MP3 in your Toyota Tacoma Double Cab 2005 2006 2007 2008 2009 2010 2012 2013 2014
How to install in dash receiver in your Toyota Tacoma Double Cab 2005 2006 2007 2008 2009 2010 2012 2013 2014
How to install radio in your Toyota Tacoma Double Cab 2005 2006 2007 2008 2009 2010 2012 2013 2014
How to install HD radio Sirius and XM in your Toyota Tacoma Double Cab 2005 2006 2007 2008 2009 2010 2012 2013 2014
How to remove the factory stereo in your Toyota Tacoma Double Cab 2005 2006 2007 2008 2009 2010 2012 2013 2014