Tuning your amp(s) is crucial to proper output and a long healthy life from your amplifier. By following the tuning steps below, your amp will produce maximum CLEAN power, provide the proper frequencies to your speakers / subwoofer(s) and provide many years of great audio!
Before starting the tuning process, you must complete the following steps:
- Power Wire (Proper size / Gauge) is connected from battery to TXD10005. ALL Fuses/Connections are installed and tightened per installation instructions.
- Ground Wire(s) (Proper Size / Gauge) is connected and tightened correctly.
- Plug and Play wiring harness is installed per installation instructions – for your model Toyota.
- Ensure that your OUTPUT plugs are NOT connected as shown in the installation diagram.
At this point your TXD10005 is powering on and you are ready to proceed to the tuning process.
Step 1: Obtain the tuning (test) tones for your TXD10005
If your Toyota is equipped with a CD PLAYER –
CLICK HERE TO DOWNLOAD / BURN TEST TONES TO CD
If your Toyota is NOT equipped with CD PLAYER –
CLICK HERE TO DOWNLOAD (DO NOT STREAM) AUDIO FILES TO YOUR PHONE
IMPORTANT: NEVER PLAY TEST / TUNING TONES ON AMPLIFIED SPEAKERS / SUBS, YOU WILL DAMAGE THEM.
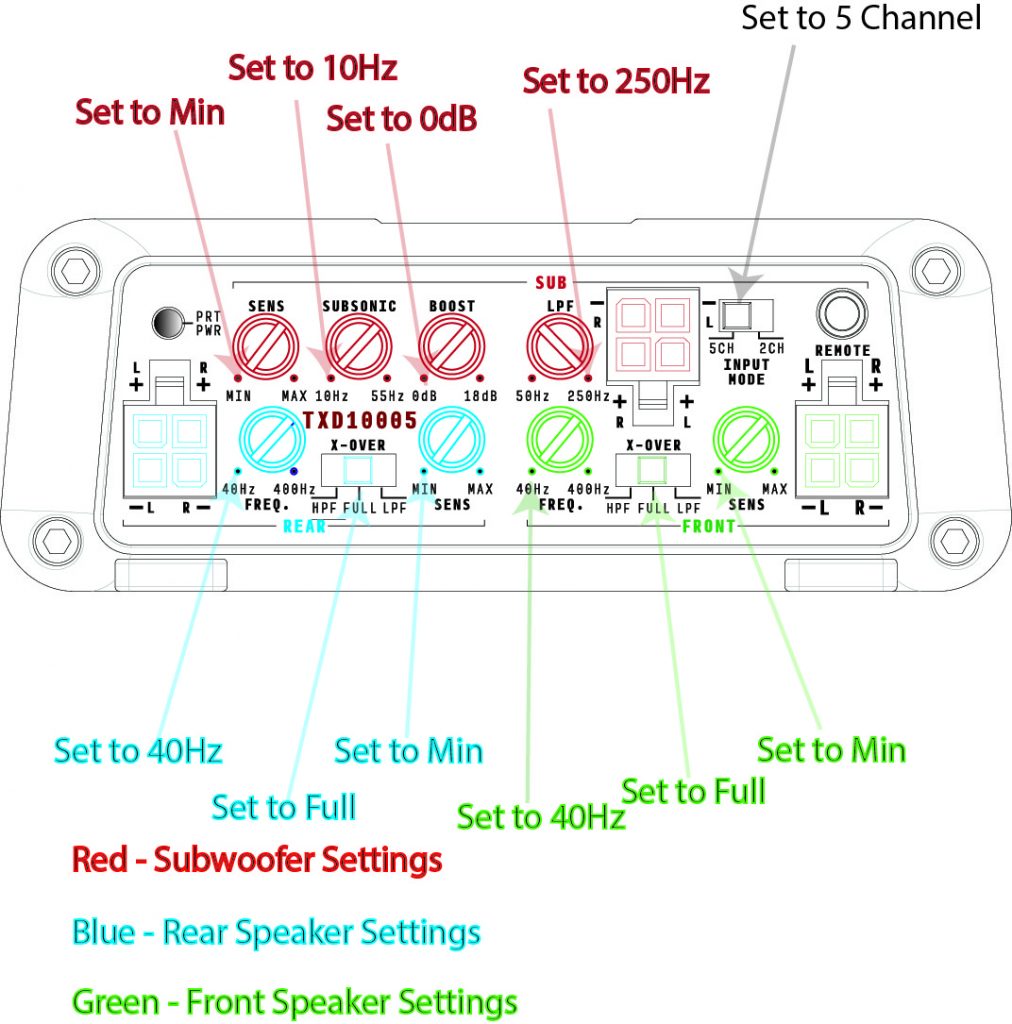
Step 2: Set all the knobs as shown in Pre-Tune Illustration 1
(Pre-Tune Illustration 1)
Adjust Amp Knobs & Switch Configuration
Adjust the knobs and switches as listed below:
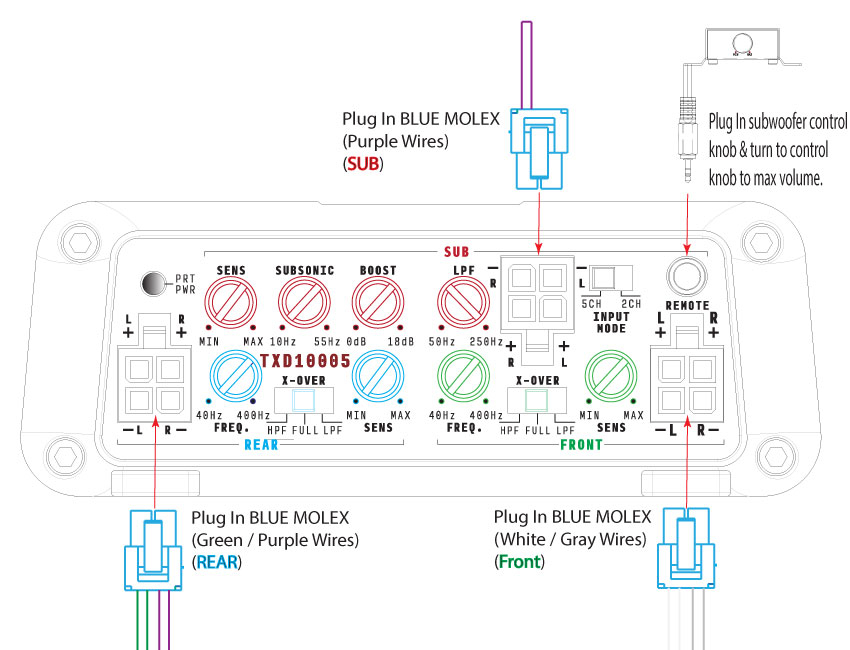
Step 3: Insert Blue Molex Plugs Into Front, Rear & Subwoofer Inputs:
NOTE: If using NTUNE6 or Aftermarket Radio Click Here
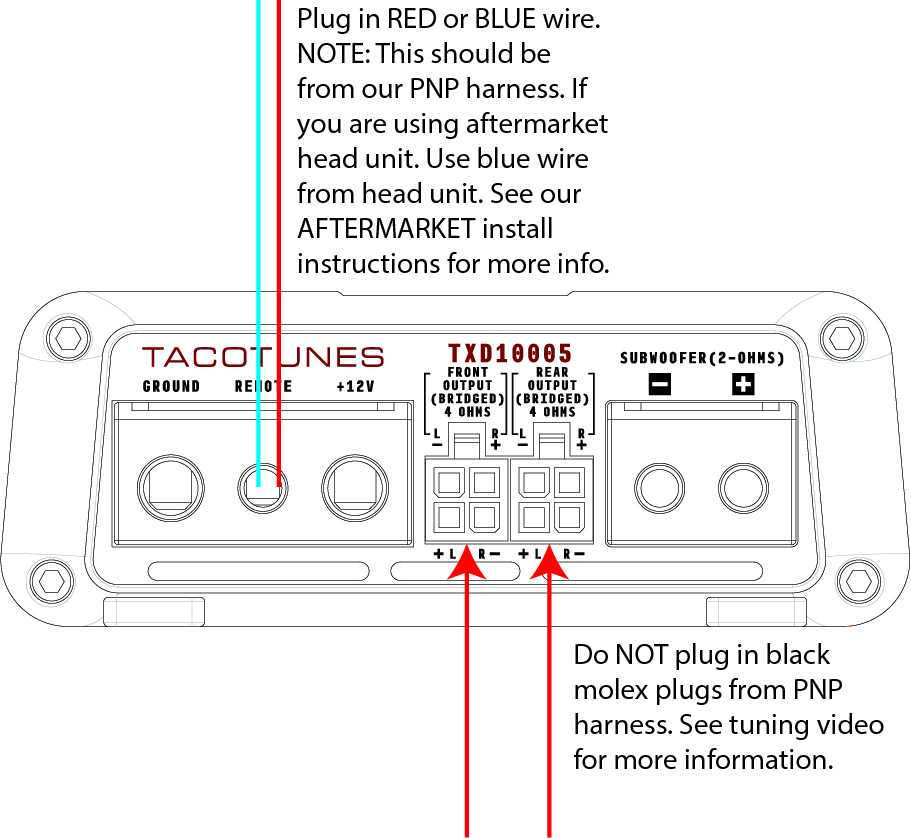
Step 4: Remote turn on wire
Connect the Blue or Red remote turn on wire included in your PNP wiring system. NOTE: If using an aftermarket head unit, use the blue remote wire from your aftermarket head unit. See our Aftermarket installation instructions here:
Step 5: Subwoofer wire connection
Connect a short piece of 12G wire to your subwoofer output. Strip the ends and be sure the + and – do not come in contact with each other.

Step 6: Output Wire Connections
DO NOT PLUG IN THE BLACK MOLEX PLUGS FROM YOUR PLUG AND PLAY HARNESS AT THIS TIME! We will plug them in AFTER the tuning process has been completed.
Locate the Black Molex connectors that have the SHORT white / gray & purple/ green wires. They are located in the same bag with the Molex / RCA connectors.
NOTE: If you are using aftermarket head unit, you will want to refer our after market head unit / tuning video.
Step 7: Tuning Video Instructions:
NOTE: The TXD10005 is best suited to work with 4 Ohm Front & Rear Speakers. If you have upgraded your speakers, please be certain you are using a component set for your front speakers to ensure you are providing a 4 Ohm load. Resistance below 4 ohms may cause excessive noise.
High Pass Filter Calculator (Speakers)
Low Pass Filter Calculator (Subwoofer)
Tools you will need to complete the tuning process:
- CD with test tones burned in the proper order (download below)
- Digital Multimeter (DMM)
- Small screwdriver